
7 Steps To Better Email Marketing
You did it – you acquired subscribers on your email list! Good job. Now your job is to make your new subscribers love your organization. What that means and what the associated KPI’s are:
- Are subscribers staying on your email list? KPI: unsubscribe.
- Are they reading your email? KPI: open rate.
- Are people learning more about your organization? KPIs: CTR and referral traffic.
- Are people spreading the word to their friends and family? KPI: Shares.
- Are users becoming active avid followers of your organization? KPI: social media audience overlap.
Great emails can transform followers into activists, supporters into donors. However, not-so-great emails can cause followers to unsubscribe and can decrease overall support of your organization.
To make email marketing effective, you need a good email management tool. One of our go-to platforms for easy, lightweight email management is MailChimp. If you’re like most nonprofit marketers, you don’t have the time or the bandwidth to learn a fullscale CRM like Salesforce. Don’t stress. One of our account managers, Michelle Thai, has compiled a simple 7 step process to make MailChimp work for you.
See you in our inbox!
Step 1: Set Up Your Test
In Mailchimp, go to Campaigns > Create Campaign > Select Regular Campaign or A/B Split Test.
- “Regular Campaign” is a simple email send.
- “A/B Split Test” allows you send an email to two groups to determine the best subject line, from name, or time/day to send campaigns.
We recommend A/B Split Tests because they’re an easy way to learn about your email audience, and better yet, it’s automated.
- A/B Split Test for Subject Line or From Names sends the email first to 20% of your specified list. The remaining 80% will go to the “winning” test. You get to decide how to choose the winner: by open rate or click rate, and how many days after the email send you’d like the winner to be chosen. We recommend sending same time the next day.
- A/B Split Test for Delivery Date/Times sends to 100% of your specified list, splitting the test 50/50.
Step 2: Selecting or Building Your Audience
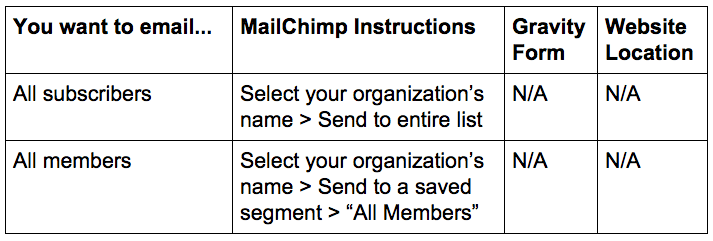
After selecting Regular Campaign or A/B Split Test, select who you’d like to send your email to.
a. Building Custom Audiences
If you have a specific list of emails you’d like to send an email to, do the following,
- In MailChimp, select your organization’s list > Select “Paste emails to build segment”
- Paste your copied emails > Select “Include these emails in my segment”
- Build Segment. MailChimp will tell you how many people you will be able to email, how many people in your list have unsubscribed, how many aren’t in the list (which means they weren’t imported into MailChimp because they had opted out in the database originally), and any other errors.
b. Sending a Follow-up to People who Didn’t Open the First Email
Ok, now say that your open rate was lower than expected. Here’s how to send a follow-up without bombarding those who did open your first email:
- Select your organization’s List > Select “Send to a new segment”
- Set the following conditions: Subscribers match all of the following: Campaign Activity did not open (select email campaign)
Step 3: Set Up ‘Campaign Info”
- Name your campaign. This will show up only in the MailChimp dashboard for internal use.
- Add an email subject line.
- From name should be your organization’s name unless your audience will recognize something else.
- “From email address”, should be your organization’s main contact email or a similar alias. We discourage using personal email addresses.
- Make sure “Personalize the “To:” field is checked.
- Under “Tracking,” the only items that should be checked are Track Opens, Track Clicks
- Ignore options under “Social Media”
- Under “More Options,” check “Authenticate campaign”
Step 4: Choose a Template
Browse templates more easily by clicking Folders. You can easily return to the template page if you decide your select is not the right one.
Step 5: Design Your Email
The MailChimp builder is very intuitive.
A few tips:
- If you’d like to use a subscriber’s first name or username in the email copy, select Merge Tag and the appropriate field.
- Remember to edit the small preview text which will show up in the user’s inbox after the subject line.
- Most important: Optimize for mobile! The mobile preview functionality is key since approximately 53% of all email is now consumed on mobile devices.
- Make sure to use UTM tags if you would like to track email-generated traffic within Google Analytics.
Step 6: Testing Your Email
After you’ve designed your email, you need to test!
a. View your email in Preview Mode
- Click Preview and Test on the top right > Enter Preview Mode
- If you used merged tags like first name or username, you can view how it would look like when sent. Simply click “View header info” on the top right > Click “View Live Merge Info” to see the merge tags in action
- X out of Preview Mode on the top right
b. Send a Test Email to Yourself and Others
- Click Preview and Test on the top right > Send a Test Email
- Remove anyone who’s email might already be checked or entered into the field (these may be left from the previous test email).
- Add your email and whoever else is giving feedback.
- Add a personal message in the field box under “Include instructions and a personal message” if you’d like.
Step 7: Send Your Email
Go to the “Confirm” page and review your settings. We recommend you return to the Recipients page and double-check your audience one more time. Then, simply click “Confirm” at the bottom again to return to the confirmation page. Continue to schedule or send your email!
Congratulations! You’re one step closer to an engaged digital community.
Looking for more email help? Get in touch and the experts at Media Cause will be happy to help.
Happy emailing!
Co-authored by Holly Millet.