
How to Set Up Email Segmentation in Luminate
There are many reasons to segment your audiences, from improving email performance, open rates, and audience retention to improving the subscriber experience. When done correctly, list segmentation gives you an edge in getting the right message to the right people to drive them to act.
But maybe, just maybe, for those of you working in Blackbaud’s Luminate Online, you have had a reason or two for why you have not segmented your audiences yet. You aren’t sure where to begin, and Luminate may be intimidating.
Have no fear. We’ll break down how to get started segmenting your nonprofit’s email audiences in Luminate so that you can start doing some kick-butt targeting.
How to Setup Luminate Segments
1. Start with Luminate Fields
Things you’ll need:
- Clean, consistent data from your database of record
- Query logic for each of the segments
- Luminate Online (goes without saying, but I said it anyway)
If you don’t quite have all these pieces in place, don’t worry. The most important part of building the queries is to make sure you have all the fields created that you are using for your queries. If some of the data is not yet populated, or will not be completely populated until you start getting more new donors and leads, you should still complete this step. A good foundation puts you in a better place when that data is coming through.
As you populate those fields, either by syncing your database of record or from transactions processed in Luminate, the dynamic queries you build will be able to pull in all the latest data daily.
You’ll want to be running regular syncs across your databases to keep all your information up-to-date, as well as spot-checking the data for accuracy and consistency. Just the difference between a field like last external gift being blank and populated can make a world of difference for what segment a donor will end up in.
This brings us to the next step in segmenting your email file…
“First you get the data, then you get the queries, then you get the dynamic audience segments… then… then you get the money.” – Scarface, probably.
2. Building Dynamic Queries
This part gets technical so bear with me.
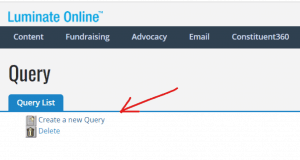
Go to Data Management –> Query

Click Create a new Query.
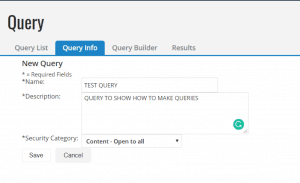
Give your new Query a good name and description. Include details on what group segment this query will build.
Now you are ready to get into the meat of group segmentation in Luminate. Building queries based on populated constituent field information.
That’s the magic sauce. You take the relevant field information that you have on your constituent records and you query off of that to make your groups.
But wait, there’s more.
You can also take information like Group Membership, Interactions, and Action Alerts to create rules for your query’s logic.
Pictured below: A blank slate, just waiting for your queries to be written.
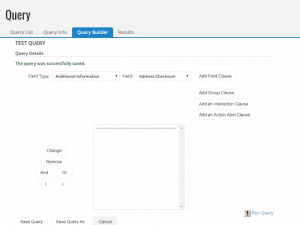
To add a new rule to your query logic, choose from the 4 “Add …” options on the right side. For today’s segments, let’s focus on using the first two:
- Add Field Clause: this allows you to choose from the “Field Type:” and “Field:” options to select a query rule based on constituent field information
- Add Group Clause: this allows you to choose from existing Groups in Luminate and create rules based on membership in any, all, or none of a particular group or set of groups
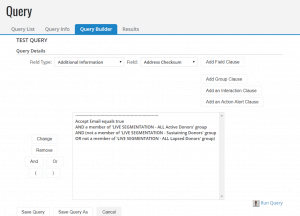
On the left side, you can set up the query logic rules that are based on Boolean Operators – i.e. a fancy way of saying your queries will be based on the conjunctions: AND, OR, NOT or AND NOT.
Ex: A query based on a mix of group membership and constituent fields.
If you are a nonprofit just getting started in Luminate Segmentation, here are some queries you may want to consider as segmentation starting points based on donor transactional information.
- Active Donors
- Active Major Donors
- Active Mid-Level Donors
- Active Sustaining Donors
- All Active Donors
A general option for starting any donor group is: Last Gift Amount is not blank or Last External Gift is not blank
For these “active” donor query parameters, you may want to start with: Last Gift Date or Last External Gift Date is on or after 365 days ago
For the various levels, it’ll be up to you on the thresholds, but you’ll want to have a field such as Highest Previous Contribution or Cumulative Lifetime Amount populated so that you may set a rule in your query logic like this: HPC is greater than $1,000 and HPC is less than $10,000 for a Mid-level Donor.
As well as segmenting by active donors, you can also set up rules to create segments for lapsed donors, who you may offer special treatment with conditional messaging content or message streams reminding them that they have not made a gift of support this year.
- Lapsed Donors
- Lapsed Major Donors
- Lapsed Mid-Level Donors
- Lapsed Sustaining Donors
- All Lapsed Donors
To separate lapsed donor segments based on the Active Rule above, change the query logic to instead say: Last Gift Date or Last External Gift Date is on or before 366 days ago
You can also segment groups based on constituents’ lack of any giving history. These folks are less likely to be engaged and may require special treatment over email that is different from your active and lapsed segments.
- Non-Donors/Prospects/Leads
To create a group of leads, tweak the earlier rules: Last Gift Amount is blank or Last External Gift is blank
OR
Last Gift Date or Last External Gift Date is blank
We recommend these as a starting point for email file segmentation based on transactions, external gifts information, and recency. There’s so much more you can do with the different nuggets of data in your database. Once you know how to build query groups, the limit is your imagination.
3. Creating dynamic groups based on your queries in Luminate
Now that your queries are set, we can build dynamic groups from them! Click Run Query and then hit refresh constantly until the results finally pop up. (It doesn’t make Luminate run any faster, but don’t let that stop you.)
Then hit Use Query. A little popup will appear like this, with these two options. It’s time! Go ahead and select Create a Group.
Next, you’ll come to this page, to make your group.
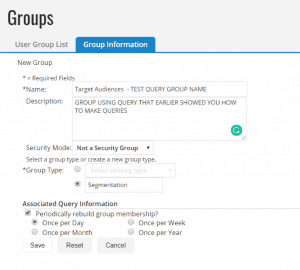
Very Important Note: ALWAYS SET “Periodically rebuild group membership?” To “Once Per Day”
This last step is crucial to your groups that are dynamically running the queries every day to populate them. This way your audience segments will always be up-to-date.
We also highly recommend coming up with a Group Naming Convention. It can be whatever you want, but the goal is that you can use the same audience segment names across the board, from message to message — when planning audiences for campaign copy drafts to searching in Luminate. This way it’s also easy to search for your groups when scheduling messages or copying and adjusting query logic. PS—we’ve got a great guide on naming best practices here.
Here are some examples of names you could use for your segment containing all of your active donors.
Live Segmentation – All Active Donors
Audience Targets – All Active Donors
Segments – All Active Donors
Now that you are armed with this new knowledge, go out there and make yourselves some queries. Make sure those groups periodically rebuild every day. And make sure you know what you named them and keep that consistent across your segments.
If you’re interested in learning more, check out our fundraising services. And if it still seems intimidating, let us know, we’re here to help!