
Paid Media Reporting Series, Part 1: How to Build + Use Paid Ad Naming Conventions
It’s Friday afternoon, and you’re ready to check on the performance of the ad campaign you inherited from another team. Clicking into the ads manager platform, things start to get fuzzy. Was this ad supposed to drive leads or site traffic? Who is this ad targeting? What’s different between this ad and the other five in the ad set? If you work in digital media, you’ve probably encountered this confusion a handful of times.
Now picture the alternative. After opening ads manager, you click through campaigns and ad sets with ease. You take a glance and know exactly which ads are performing the best. This saves you and your team time and confusion. When you pull a report in Excel or Google Sheets, it’s informative and just makes sense!
This is the first blog in a series about creating Paid Media Reporting Dashboards. Strong and consistent naming conventions at the ad or creative level are the nuts and bolts of an informative and easy-to-use reporting dashboard. I recommend this process for all channels except Search. Let’s get started!
Choosing Naming Convention Attributes
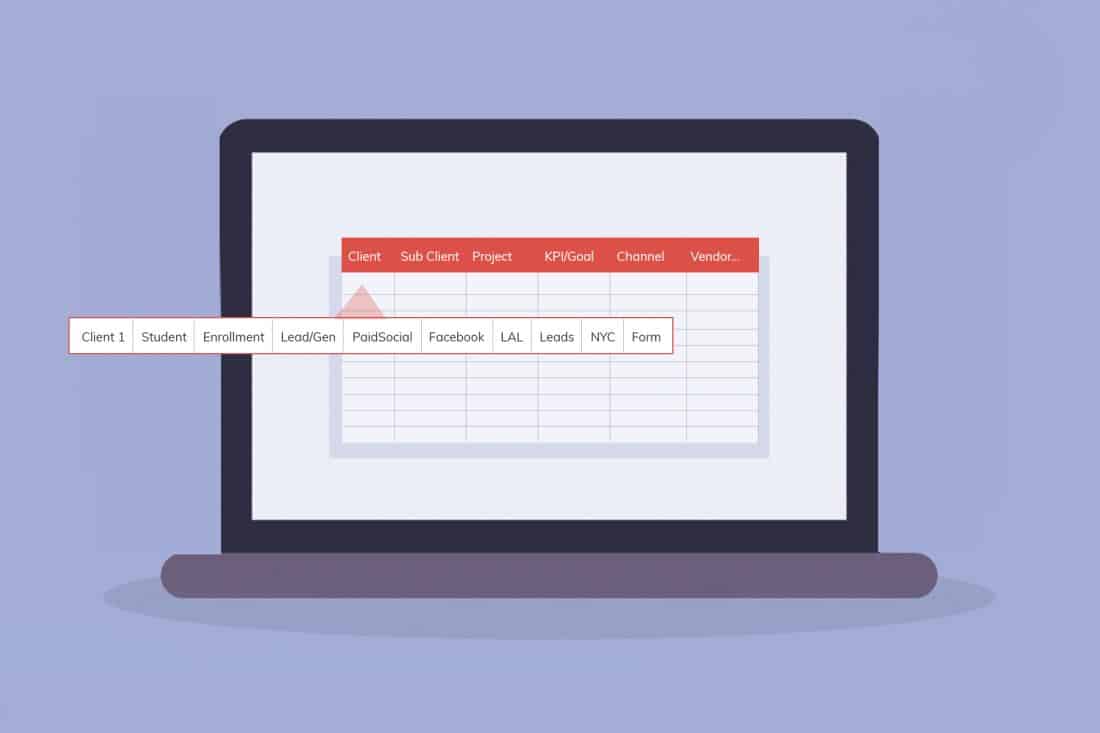
The first step in this process is determining which attributes should be included in your naming conventions. It’s important to think long-term about this selection. Over the course of a year or more, what types of information would you like to know about each ad that ran? I focus on the following categories:
- Client
- Sub-Client or Project (i.e. student enrollment or teacher recruitment)
- KPI/Goal
- Channel
- Vendor
- Geo
- Targeting Type (i.e. lookalike, retargeting, interest)
- Targeting Segment (i.e. Lookalike – Last Year’s Leads, Retargeting – Site Visitors)
- Creative
- Copy
- CTA (optional)
- Landing Page (optional)
- Ad Type (i.e. static, video, carousel, banner, rich media) (optional)
- Message (i.e. back to school, enrollment deadline) (optional)
- Banner size (if you use programmatic)
Here are a few questions to think about when choosing your list:
1. What types of information do you want to sort and filter by? i.e. client, KPI/goal, channel, vendor
2. What types of things do you test, and how can you quickly differentiate testing attributes? i.e. Targeting Type/Segment, Creative, Copy, Ad Type, Message
3. Are there any breakdowns you need to easily sort by in reporting? i.e. geo, sub-client, or project
Starting Your Google Sheet Name Builder
If you can, using a shared document like Google Sheets can be more beneficial than Excel. With Google Sheets, you can share real-time data with teammates and restore old versions if that is ever necessary.
To set up your sheet, highlight the top row in a background color and list your attributes (Client, KPI/Goal, Channel, etc.) from left to right. Click View → Freeze → 1 Row so that the header row shows up at all times.
Start filling in cells to describe each ad that you’re running. You can do this for ads that are already live in ad platforms or for new ads that you’re ready to launch. I find it easiest to build chunks of ad names based on target audience groupings.
- Go through your first audience segment and create a row for each creative variation that is running.
- If the same creatives are running for each audience, copy and paste this chunk of names and update the Targeting Type/Targeting Segment to create a version for each audience.
- Within minutes, you could have rows filled out for dozens of ads.

Here are a few things to keep in mind:
- It’s important to fill in every cell. If a cell really can’t be filled in, use placeholder text such as “x.”
- I like to use a descriptive title for each new grouping of ads. For example, I highlight a row and write a description in bold, such as “Facebook Back To School Campaign—September 2022.”
- When filling out cells, it’s important to be as consistent as possible. If you call it “LeadGen” in one place, use the same capitalization and spelling everywhere.
- I write the contents of each cell without spaces (i.e. BlueStudentPhoto—this saves space in my long ad names. If you want to use spaces, that’s okay!
Using Formulas to Create Ad Names
Now you have 10-15 individual cells containing info about each ad. From here, let’s use a formula to create one long string.
See video example below.
1. Add a separator column to the right of the staging area—highlight the column next to your last attribute and shade it. This will help you keep your document organized and easy to view.
2. Name the next blank column “Ad Name”
3. Use the JOIN formula to create an ad name string with all attributes, using an underscore to separate attributes: =JOIN(“_”,A3-N3) where A3 is the first attribute and N3 is the last attribute (replace N3 with whatever your last descriptive attribute cell is).
4. Copy and paste this formula to all rows that you’ve filled in.
Bonus: If you’d like to use consistent Campaign or Ad Group names, you can do so using a similar formula. In that case, create a new column and pick up specific attributes in your =JOIN formula (i.e. =JOIN(“_”, A3-C3, F3-H3). The Campaign + Ad Group structure can differ per platform. For example, on Facebook, the Campaign name might include Client + Goal, with Targeting sitting at the Ad Group Level. On LinkedIn, the Campaign Name may need to include Targeting.
PS: If you’re more comfortable with the Concatenate formula, it does the same thing as JOIN—just takes a bit more manual work.
Using These Names in Your Campaign
Voila! In your Ad Name column, you should have a list of ads that include each variation you plan to run. Keep this document open in a window or tab while you work in ads manager platforms. Copy and paste each ad name from the Google Sheet to the ad platform as you launch or rename ads.
Using an ad name for each targeting segment might add some extra time to your execution process (i.e. if you duplicate a set of creatives from one targeting segment to another, you’ll need to rename the ads to reflect the accurate targeting segment). Some ad platforms have batch editor tools to make this process easier, such as Facebook/Meta.
Trust me, the extra time on the ad execution side is worth it. You’ll see why as we move through this blog series!
Let us know if you have any questions or if you try this out.